Monday, July 20, 2009
Chat Server Proxy 2
Monday, January 26, 2009
IP Addresses for Mozilla,netscape etc.
Tuesday, January 20, 2009
The computer will not wake up from sleep or standby mode
Friday, January 16, 2009
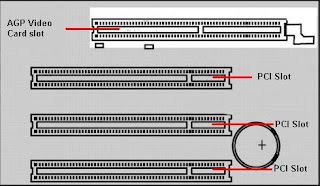
How to install a new video card?
WARNING: There is a risk of personal injury. To avoid electrical shock, always turn off and disconnect the computer from power before opening the case.
WARNING: There is a risk of hardware damage. To avoid Electro-Static Discharge damage, a wrist strap must be used to discharge static electricity while in contact with the internal components of a computer.
WARNING: There is a risk of data loss. Backup all important data before installing additional hardware to the computer.
2. Disconnect the computer from power.
3. Remove the cover from the computer.
4. Install the new video card according to the manufacturer's instructions.

- If a PCI video card was installed, both video adapters will be available at this time for multiple monitor support.
- If the computer shipped with an onboard video adapter, the onboard video adapter cannot be disabled in the systen BIOS. Because of this, the add on PCI video card can only be used as a secondary video card, and not the primary one.
- If the computer shipped with an AGP video card, either a PCI or AGP card can be used as an upgrade.
- Installation and driver support are provided by the video card manufacturer.
Friday, November 28, 2008
Chat Server Proxy
Tuesday, November 25, 2008
Fault in module Urlmon.dll when starting the Internet Explorer software
1. Click the Start button, then click Run .
2.In the Run window, type Regedit and then click the OK button.
3. In the Registry Editor window, double-click the HKEY_LOCAL_MACHINE folder.
4. Under the HKEY_LOCAL_MACHINE folder, double-click the Software folder.
5. Under the Software folder, double-click the Microsoft folder.
6. Under the Microsoft folder, double-click the Windows folder.
7. Under the Windows folder, double-click the CurrentVersion folder.
8. Under the CurrentVersion folder, double-click the IntenetSettings folder.
9. Under the IntenetSettings folder, double-click the Accepted Documents folder.
10. In the right pane , click to select Quick View Plus .
11. On the Menu bar, click Edit .
12. On the Edit menu, click Delete .
13. In the Confirm Key Delete dialog box, click the Yes button.
14. In the Registry Editor window, click the Close button.
15. Restart the computer.
Thursday, November 20, 2008
Internet Explorer 7 software crashes when attempting to access AOL service Web mail
Open the Internet Explorer 7 software.
2. In the Internet Options window, click the Security tab.
3.On the Security tab, in the Security level for this zone section, click to remove the check from the box next to Enable Protected Mode.
4. In the Internet Options window, click the OK button.
5. In the Internet Explorer window, click the X in the upper-right corner to close the window.
6. Re-open the Internet Explorer 7 software.
7. Go to the http://webmail.aol.com Web site and sign in with the appropriate AOL user name and password.
Friday, October 31, 2008
How to troubleshoot the computer to resolve issues that may cause it to stop responding?
NOTE: Since each of these steps represents a possible solution to this issue, check the computer performance after completing each step.
1. Close any programs that are active but have stopped responding.
2. Reduce the number of applications running and active on the computer.
3. Disconnect or remove any added hardware or peripherals. This includes any printers, USB devices, added memory, internal or external drives, and any type (network, sound, video, USB, etc.) adapter card.
4. Remove unnecessary files from the hard drive.
5. Detect and repair errors on the hard drive.
6. Remove and reinstall the video drivers.
7. Reinstall the application that was active when the system stopped responding.
8. Perform a full system recovery .
Formatting the hard drive will remove all added data, software, and information from the hard drive.
Remove any third-party hardware that has been added to the system prior to beginning a recovery procedure.
If the operating system has been upgraded, use the FDISK application to remove the partitions before performing a system recovery. Some operating system partitions, such as NTFS and Linux®, may not be removable using the FDISK application and may need to be removed using the other operating system install or boot disk or CD.
If a third-party partitioning utility was used to partition the drive, contact the third-party manufacturer to remove the partition before starting the recovery process.
A system recovery cannot be performed through a network shared drive.
Monday, October 27, 2008
Computer Hangs or Restarts When You Connect USB Device 3
• When you select a specific device in Device Manager and then click the Properties button, you see a property sheet. The property sheet has a General tab.
NOTE: Some devices may have other tabs besides the General tab. Not all property sheets have the same tabs; some devices may have a Resource tab, Driver tab, and Settings tab, or some combination of these.
At the top of the property sheet, there is a description of the device. When you click the Resource tab, the window in the middle of the tab indicates which resource types are available for the selected device.
The list box at the bottom contains a Conflicting Device list. This list indicates a conflict with an error code.
• Note the Use Automatic Settings check box. If Windows successfully detects a device, this check box is selected, and the device should function correctly. However, if the resource settings are based on Basic Configuration
1. Click the Use Automatic Settings check box to clear it.
2. Click Change Setting.
3. Click the appropriate I/O range for the device.
Notes
| • | If you click My Computer and then click Properties, you see a property sheet with a View Resources and a Reserve Resources tab. The Reserve Resources tab excludes a resource from use by Windows. The View Resources tab displays the resources that are allocated by Windows or inherited from a Plug and Play BIOS or PCI bus computer. |
| • | To disable a device in Device Manager, in Properties, on the General tab, clear to select the Disable in this hardware profile check box. Back to article 1 |
Monday, August 4, 2008
Are you Looking for Intel Wireless WiFI Network Connection Driver?
Wednesday, July 9, 2008
How to Troubleshoot the missing Operating System?
1. Remove all removable media and batteries.
2. Remove any added hardware.
3. Reset the computers BIOS to the default values.
NOTE: Verify the the hard drive is detected in BIOS. If the hard drive is not recognized in BIOS, the hard disk drive is the cause of the error.
4. Perform a System Recovery.
Tuesday, July 8, 2008
How to Deal with Disk Boot failure?
1. Remove all removable media (floppy disks, CDs, etc) and restart the computer.
2. Press and hold the power button for up to 10 seconds to shutdown the computer.
NOTE: If the system enters standby, press and hold the power button for up to 10 more seconds until the computer powers off, then restart the computer.
3. Reset the BIOS Setup defaults .
4. Remove nonbundled installed hardware .
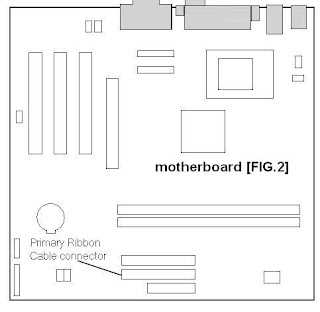
5. The hard drive may not be connected properly. Ensure the ribbon cable from the hard drive [FIG.1] hard drive to the motherboard [FIG.2] is is firmly seated.
6. Perform a System Recovery of the computer.
7. If the issue is still unresolved after completing all of the troubleshooting steps, service will be required

Wednesday, July 2, 2008
How to Change the Computer Description?
1. Click the Start button, and then click Control Panel.
2. In the Control Panel window, click System and Maintenance.
3. In the System and Maintenance window, click System.
4. In the System window, under Tasks, click Advanced system settings.
NOTE: If prompted for an administrator password or a User Account Control prompt is displayed, type the appropriate password or click Continue.
5. In the System Properties window, click the Computer Name tab.
6. On the Computer Name tab, in the Computer description box, enter a description for the computer.
7. In the System Properties window, click the OK button.
Monday, June 23, 2008
When Computer Crashes?
Monday, June 16, 2008
Windows encountered a problem installing the driver software for your device
When attempting to install a new hardware device on a computer running the Windows Vista operating system, this error message may display if the driver for the device cannot successfully be installed. The cause and resolution for this issue is provided in Microsoft Article ID 940199.
Sunday, June 15, 2008
Error: Cannot Confirm a Connection with a Camera
This error message may occur during the installation process for the Picture Motion Browser software. To resolve this issue, follow the steps below.
1. In the Sony Picture Utility dialog box displaying the error message, click the OK button to acknowledge the error.
2. In the Sony Picture Utility window, click the Cancel button.
3. In the Exit Setup dialog box, click the Yes button.
4. In the Sony Picture Utility window, click the Finish button.
5. Disconnect the USB cable connecting the camera to the computer.
6. Turn off the camera.
7. Close any unnecessary software applications that may be running on the computer.
8. While the camera is disconnected, start the Picture Motion Browser software installation.
9. Follow the on-screen instructions until you reach the Confirm camera connection screen.
10. Connect the USB cable from the camera directly to the computer.
11. Turn on the camera.
IMPORTANT: After being turned on, some cameras will display a list of connection options on the LCD screen. If so, select the appropriate option for connecting to the computer. Afterwards, [Connecting...] may appear on the LCD screen even after a connection is established.
12. Wait approximately 60 seconds before continuing.
13. In the Sony Picture Utility window, click the Next button.
NOTE: If the camera connects, no further troubleshooting is required. However, if the error message reoccurs, click the OK button and then repeat steps 12 and 13 again. If repeating these steps still does not resolve the issue, continue following the steps below.
14. Repeat steps 1-4.
15. With the camcorder still connected and turned on, go to the Device Manager of the computer.
For Windows 98, 98SE, and Me: Right-click the My Computer icon, left-click Properties, and then left-click the Device Manager tab.
For Windows 2000 and XP: Right-click the My Computer icon, left-click Properties, left-click the Hardware tab, and then left-click the Device Manager button.
For Windows Vista: Click the Start button, click Control Panel, click System and Maintenance, and then click the Device Manager button.
16. In the Device Manager window, at the left of Universal Serial Bus controllers, click the + symbol.
17. Under Universal Serial Bus controllers, right-click Sony DSC or USB Mass Storage Device to display the drop-down menu.
18. In the drop-down menu, click Uninstall or Remove.
19. In the Confirm Device Removal dialog box, click the OK button.
20. Disconnect the USB cable connecting the camera to the computer.
21. Turn off the camera.
22. Restart the computer.
23. After the computer restarts, repeat steps 8-13.
NOTE: During these steps, the computer will recognize the camera connection and properly reinstall the USB driver. The error message should no longer appear.
24. Continue to follow the on-screen instructions to complete the software installation.
Saturday, April 26, 2008
Troubleshooting Picture Motion Browser Software
Here is the great news for Picture Motion Browser users. Since most of us are having difficulties using the picture motion browser software, I did gathered some important details that you might be interested for ease of use using the picture motion browser software. The first one is on how to check the version of your Picture Motion Browser. You can actually look at the version of your picture motion browser in the CD-ROM supplied with your prduct on this link:
http://support.d-imaging.sony.co.jp/www/disoft/int/pmb/check/index.html
For the information of picture motion browser matrix (it includes printing, e-mail, creating a disc, exporting, basic function, viewing, and editing) here is the complete link:
http://support.d-imaging.sony.co.jp/www/disoft/int/pmb/ver/matrix.html
This section is for the Picture Motion Browser’s complete operation guide which includes the step-by-step illustrations in printing and creating a disc.
http://support.d-imaging.sony.co.jp/www/disoft/int/pmb/feature/index.html
For problems concerning troubleshooting here is the link that contains the most typical trouble reported from Picture Motion Browser users. It includes installation, playback, and disc issue.
http://support.d-imaging.sony.co.jp/www/disoft/int/pmb/trouble/index.html
The last link is all about the information that you need to have before calling a technical support representative. So before you contact our customer center to ask for any technical support for Picture Motion Browser, please check and keep the following information ready at hand.
http://support.d-imaging.sony.co.jp/www/disoft/int/pmb/inquiry/index.html
Thursday, April 10, 2008
What is Windows Logo testing error message?
How to Print Images with the Date Inserted?
1. You can print images with the date inserted using Picture Motion Browser.
2. If the camera doesn’t have a feature for superimposing dates on images, they can print images with the date superimposed if the printer or software that they are using can recognize EXIF information.
3. When printing pictures in a certain shop, images can be printed with the date inserted if you ask them to do so.
Computer Memory Upgrade l RAM Prices: 4GB 2GB 1GB l DDR2 DDR l Registered SODIUM FBDIMM UDIMM

Are you looking for a great deal for your Computer Memory? Well, I have great news for you! Memory Deal is the best place where you can get original computer memory and upgrades. Does the RAM (Read Access Memory) of your computer need a boost? Do you want to have a huge space for your main memory for your computer for personal usage and workstations then check out the RAM Memory Prices offered by Memory Deal. Comparing to low offered prices you can get the best and the latest technology from them. Aside from that, you will also find their Computer Memory Prices with better quality for your computer or server use. To keep up with the updated versions of advance technology of computers, replacing the software or hardware with a newer and better version to improve computers characteristics bring the system up to date. So, if gaming, pictures and video editing slower the system why not make a 2GB Memory Upgrade for your computer. If you want the best check out Memory Deal because they offer great values, original factory product, latest technology and exact RAM for your computer upgrade.